Not every home investment is about splurging £1000s on large-scale renovations; sometimes it’s just as cost-effective to work on what you’ve already got going on. So, if you were wondering how to clean engineered wood flooring, you’ve hit the jackpot. In this article, I’m laying bare everything I know about engineered wood maintenance to extend the lifespan of the material and keep the aesthetics looking as fresh as they were on install day.
But why believe my advice? Well, besides the trust I’ve earnt from my customers over the years, I’ve won awards for my work with floors as one half of the Derwenthorpe Flooring duo. And with decades of experience under my belt, you could call me something of a flooring fanatic.
Enough preamble. Let’s get on with the guide.

The Flooring is One of the Hardest Working Elements of Your Home
So, tip-top engineered wood maintenance is a must. Not a ‘I’ll get around to it later’ or ‘It’s a solid floor covering, so it doesn’t need cleaning’, as I’ve overheard, absolutely aghast.
The reason being that leaving your engineered wood planks to gather dust, debris, muddy footprints, and God-knows-what other grime is setting yourself up for a trickier job when you eventually get to it and increasing the odds of your floor accruing premature wear and tear.
The tiny bits of grit that stick between the grips of your shoes, unknowingly dragged about the room, contribute to tiny surface scratches, whilst layers upon layers of dirt mean that you’ll need more water to get it sparkling again. And *spoilers* engineered wood and excessive moisture don’t mix well.
Ultimately, though, homeowners should approach cleaning their flooring from a perspective of protecting their investment, a property value asset, if you will. That means following what the experts recommend, from the material manufacturers to leading flooring installers, like us at Derwenthorpe.
How Do You Clean Engineered Wood Flooring the Proper Way?
It might shock you, but 17% of Brits admit they don’t clean their floors, at all. Ew… This makes a strong impression of your home, with clean, fresh floors quite the low bar to achieve.
Especially since the bulk of the maintenance is simply common sense: cleaning up muck with a damp cloth and gentle cleaning solution and then patting it dry with a tea towel.
Here’s how I, as a flooring installer, would go about keeping the engineered wood flooring spick and span, without risking damage to the boards.
Hoover, Dust and Remove Dirt with a Damp Mop or Cloth
The best results that maintain the integrity of the material rely on a mixture of…
- Semi-regular hoovering with an appropriate head for hard floors;
- Dusting with a microfibre cloth;
- Cleaning with a moist cloth/mop and engineered-wood safe detergent combo;
- Or with a hard floor cleaner specifically designed with this type of flooring in mind.
The trick is to never, and I repeat, never get the floor sopping wet. Whilst engineered wood boasts excellent moisture resistance, it’s technically not 100% waterproof, meaning that prolonged unnecessary exposure can lead to warping over time. Likewise, refrain from scrubbing the floor with an inch of its life; ultimately, this leads to scratches and nicks that let the moisture seep in where it’s unwanted.
A Cleaning Timeline as Suggested by the Specialists
Now, you have the general method committed to memory. It’s time to get these chores in your mental calendar. Here’s what I’d suggest to keep on top of the cleaning.
Daily Tasks
- Wiping away splashes and spills immediately with a damp cloth, drying with a tea towel right after
- Using a microfibre cloth to rid the floor of any dust and debris you spot
Weekly Chores
- Hoovering or brushing the floor
- Wiping up any dirty patches you notice
Your Monthly Deep Clean
- A proper, scheduled clean with a damp mop or specially made hard floor cleaning appliance
- Take doormats outside and shake them out
- Trim the claws of your fuzzy friends
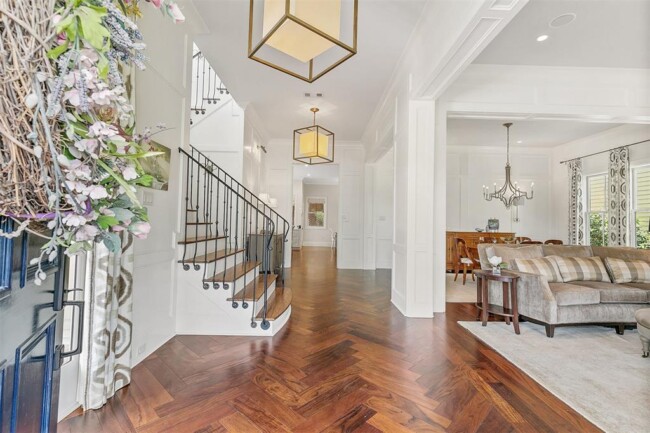
5 Bonus Maintenance Tips to Avoid Damage
Before I wrap up, I bet you’re dying to know what else you can do to protect your precious engineered wood floors. The short answer is to be proactive and err on the side of caution; the long answer? Well, here’s that in full…
Ensure a Professional Fit for Good Performance from Day Dot
We all know someone we wouldn’t exactly trust with a toolkit. As it pertains to your flooring, don’t let them near the installation (even if that’s you!).
Because a quality fit impacts daily maintenance, months and years into the future. For example, a common mistake I see with DIY jobs is that the installer has misjudged the spacers when putting the planks in place or failed to acclimatise them entirely. This means that when the material expands and shrinks along with fluctuations in temperature, you start to see gaps.
Gaps + moisture are a recipe for damp, rot and swelling. Not the fate you intended for your beautiful engineered oak or, worse still, a herringbone pattern you took hours to align just so.
Do Everything You Can to Mitigate Scratches & Dents
Deep scratches into the wear layer of your floor compromise its performance and, frankly, look pretty darn ugly. Generally speaking, quality engineered wood flooring is a pet-friendly and hard-wearing option, but that doesn’t mean they’re indestructible.
Here are my recommendations for taking a little more care:
- Establish home rules for wearing shoes in the house
- Place down long runner mats for entrance halls or foyers
- Keep pets’ claws at a manageable length
- Attach felt floor protectors to your furniture and avoid dragging it around the room
- Don’t drop heavy items, like a dumbbell, on your floor
Tackle Spillages & Gunk ASAP
Your motto for cleaning your engineered wood floor ought to be ‘sooner rather than later’. By this, I mean dealing with the mess as soon as it’s noticed to minimise long-term damage.
Particularly when it’s a substance like alcohol, oil, a chemical, paint or a substantial amount of water, you need to act fast; otherwise, your floor runs the risk of acquiring stains and other unsightly marks. In the case of random spills, a quick wipe with a cloth and forgiving detergent will do the trick – you don’t need to mop the entire floor.
The Trick with Stains & Discolouration
When spills and marks enter pesky territory, it’s difficult to know what to do. But don’t despair, even with the stubborn stains there’s hope.
Run through these tips step-by-step:
- Resist the urge to grab the bleach or a scourer; this will do more harm than good, destroying the top layer of the floor.
- What you do want to do, is try a natural alternative, such as the baking soda method. Essentially, you make a thick, creamy paste from water and baking soda and rub it directly into the affected patch, leaving it to do its magic over the next 24hrs. Clean it off with a damp cloth and you may be able to lift the stain.
- A similar method, using vinegar and warm water is also worth a shot. Simply mix the two together in equal parts and then dab onto the site of the stain. Leave it for half an hour before giving it a good wipe.
- Unsuccessful still? This is your sign to go to the professionals, invest in a specialist (engineered wood safe) cleaning solution, or in the worst-case scenario sanding down the floorboards, which brings me to…
When Worse Comes to Worst: Refinish the Floor
Did you know that in certain cases you can actually refinish your engineered wood flooring? As in, sand down and treat the surface to return it to its former glory?
So if the surface is marred by a particularly visible damaged patch, you can erase it from sight and then hopefully memory too.
Any competent DIYer can give this a go; however, I do want to make clear a few parameters. 1) Pay attention to the wear layer’s thickness. Here, you don’t want to shave too much off the top veneer, as this may expose the plywood core and inadvertently ruin the boards. 2) Make sure you do the job thoroughly, with the right tools and treatment to ensure the finish is even and natural, as it should be.
Conclusion: Hidden Heroes Deserve TLC Too
To conclude, light-touch, regular upkeep is hands down the best way to keep your engineered wood flooring in good condition; it’s also just easier to keep on top of, whilst navigating the throes of adult life.
Right, let’s take it from the top one more time:
- Regularly dust and hoover your hard floors
- Wipe up spills and stickiness as you go with a soft, damp cloth
- When undergoing a deep clean, sopping wet mops are a no-no
- For speed, consider investing in a specialist hard floor cleaner
- And, if in doubt about the underlying condition of the floor, get an expert on board.
Whatever you do, just remember, cleaning isn’t merely cosmetic. Getting rid of the grime constitutes maintenance too.
©2026 The Dedicated House. All rights reserved. No part of this blog post may be used or reproduced without the written consent of the copyright owner.
Click the links below for any posts you have missed:
 Protecting Your Home from Tree-Related Property Damage
 Charlotte Homeowner’s Guide to Spotting Roof Damage After Severe Weather
 Property Division Mistakes to Avoid in NH
 Funding Safe Drinking Water Wells for Rural Communities
 The Connection Between Mental Health, Stress and Substance Abuse
 Why Addiction Recovery Often Requires More than Simply Stopping Drugs or Alcohol
I’d love for you to join my email list! You’ll receive a notification straight to your inbox which will include links to my latest home project posts! Simply enter your address below.
Thanks for stopping by! Have a wonderful day/night depending on where you are in the world! Go with God and remember to be kind to one another!
Toodles,

Leave a Reply