Older homes reward a different kind of housekeeping. Original woodwork, plaster, vintage tile, painted floors, and aging hardware can be durable, but they may also have fragile finishes, previous repairs, and hidden moisture issues. The goal is not to make every surface look brand new. It is to keep the home clean, comfortable, and stable without causing unnecessary wear. A patient’s routine also makes it easier to notice small changes before they become larger maintenance problems. In many cases, preserving the existing finish is safer and more practical than trying to restore a heavily worn surface through frequent cleaning.
For households that need help maintaining a historic house, bungalow, row house, or other longtime property, residential cleaning and maid services can be most useful when the cleaning plan identifies delicate surfaces and avoids a one-product-fits-all approach. Gentle tools, limited moisture, and a consistent routine usually matter more than aggressive scrubbing. It can also help to tell anyone cleaning the home which areas have original finishes, prior water damage, loose materials, or products that should not be used.
Why Older Homes Need a Different Cleaning Plan
Age alone does not make a house delicate, but old surfaces often have layers of paint, wax, repairs, and wear that respond poorly to harsh chemicals or abrasive tools. Detailed trim, radiator covers, deep window sashes, and narrow stair corners also collect dust in places modern homes may not. A preservation-minded routine protects the materials already in place, an approach reflected in the National Park Service guidance on preserving historic building materials and finishes. Materials in the same room may require completely different care: painted trim, brass hardware, old glass, and ceramic tile should not automatically receive the same product or amount of moisture. Slower, surface-specific cleaning can prevent dulling, scratching, swelling, or accidental removal of an older finish.
Build a Safe Cleaning Kit
Keep supplies simple: clean microfiber cloths, an electrostatic duster, a vacuum with soft-bristled attachments, small nylon brushes, a pH-neutral cleaner, a spray bottle of clean water, gloves, protective eyewear, and a sturdy step stool. Use separate cloths for kitchens, bathrooms, and dusty work areas. Always read product labels, keep chemicals in their original containers, and never mix cleaning products. Labeling clothes by room or task can reduce the chance of spreading grease, bathroom residue, or gritty particles onto sensitive surfaces. Keep a small bucket or caddy nearby so cleaners do not need to be set on furniture, floors, or window sills while work is underway.
Start with a Room-by-Room Inspection
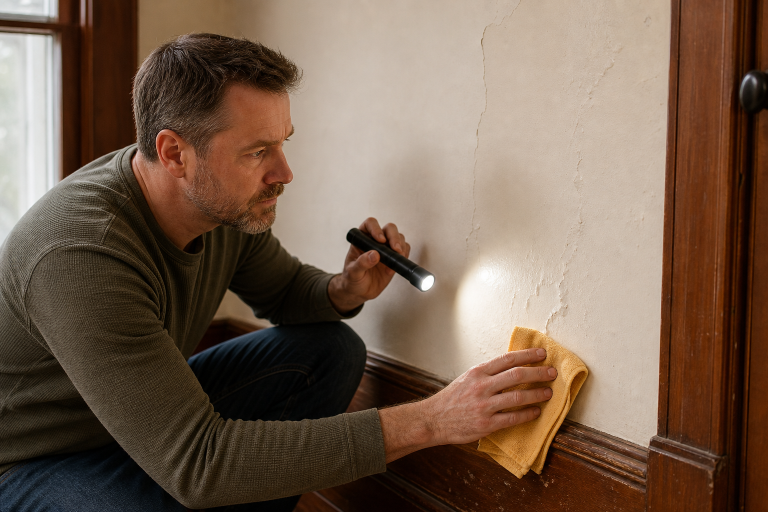
Before beginning a deep clean, walk through each room slowly. Look for peeling paint, loose plaster, crumbling grout, water stains, soft flooring, cracked caulk, loose tile, pest debris, and musty odors. Check that the wood trim feels dry and stable. Take photos of visible damage so changes are easier to track later. Pay particular attention to areas around windows, exterior doors, plumbing fixtures, chimneys, and basement walls, since these locations can reveal moisture-related issues. A brief written note that includes the room, date, and location of a concern can be useful for comparing conditions over time or discussing repairs with a qualified professional.
Cleaning may uncover a problem, but it rarely fixes its cause. Recurring stains can indicate a leak, while powdery walls or moving plaster may require repair before any wet cleaning. If old paint is peeling, sanding, scraping, drilling, or demolition should not be treated as ordinary cleaning. Homes built before 1978 may pose lead-paint risks, and the EPA outlines lead-safe renovation practices for DIY homeowners when painted surfaces will be disturbed.
Use a Dry-First Dusting Method
Dry cleaning should be the foundation of the routine. When weather and outdoor air quality allow, open windows for ventilation, work from high surfaces to low ones, beginning with ceilings, crown molding, vents, shelves, and door frames. Use a soft vacuum brush or microfiber cloth rather than a hard vacuum nozzle. Clean or empty the vacuum filter as needed so it continues to pick up fine dust. Move slowly around decorative carvings, aging wallpaper edges, and fragile light fixtures, where a rushed motion can catch or loosen material. If dust is heavy, make more than one gentle pass instead of pressing harder with a single cloth.
Only follow with light damp cleaning where residue remains. For example, a dry microfiber cloth may be enough for decorative trim, while a barely damp cloth can address a sticky mark near a doorway. Avoid soaking cloths, spraying surfaces directly, or scrubbing before loose grit has been removed.
Care for Wood, Plaster, Floors, and Tile
Original Woodwork and Doors
Dust carved details with a soft brush or dry cloth. Use very little water on aged, unfinished, or uncertain wood, and apply cleaner to the cloth rather than the surface. Avoid abrasive pads, rough sponges, and buildup-prone wax, oil, or silicone products unless they are known to be suitable for the finish. Clean carefully around hinges, handles, and door edges without soaking them. Wipe away any remaining moisture promptly, especially near joints, veneer edges, and decorative inlays. If a surface becomes tacky, cloudy, or discolored during a test clean, stop rather than applying more product.
Painted Plaster Walls
Vacuum loose dust with a soft attachment and use light pressure. A dry cleaning sponge may be suitable for some stable matte-painted surfaces. Do not wet-wipe cracked, powdery, flaking, or soft areas. Stop immediately if paint peels, plaster shifts, or a stain appears that is connected to moisture. Avoid repeatedly rubbing one spot, since even mild friction can leave a visibly cleaner patch or burnish a flat paint finish.
Older Floors and Tile
Remove grit from wood floors before using a lightly damp microfiber mop. For older tile and grout, clean small sections with a mild cleaner and soft brush rather than flooding the floor or using harsh scouring products. Confirm that any cleaner is appropriate for the specific stone before using it. Avoid steam mops, steel wool, wire brushes, soaking-wet mops, strong solvents, and untested acidic products. Use entry mats and prompt spot-cleaning to limit abrasive sand, salt, and dirt that can be tracked across finished floors. Lift furniture when possible rather than dragging it, and place protective pads under the legs to reduce scratches.
Handle Kitchens, Bathrooms, and Heating Areas Carefully
For light grease on suitable kitchen surfaces, mild dish soap and warm water are often enough. Use non-abrasive products on porcelain and enamel, dry metal fixtures after cleaning, and consult the manufacturer’s guidance before using vinegar or other acids. Keep rooms ventilated and watch for chipped enamel, damaged sealant, loose tile, and leaks around plumbing. In bathrooms, drying shower walls, tub edges, and fixture bases after use can help limit the lingering moisture that may worsen failed caulk or hidden plumbing leaks. Use separate brushes and cloths for toilets and other bathroom surfaces to avoid cross-contamination.
Before cleaning accessible vents, registers, or radiator covers, turn off the system. Vacuum grilles with a soft brush attachment, lift removable covers carefully, and use a flexible duster between radiator fins. Do not force stuck covers or reach into unsafe openings. Schedule HVAC service when the system needs attention beyond accessible dust removal.
Create a Seasonal Cleaning Schedule
- Spring: Remove winter grit, clean windows and screens carefully, dust high trim and fixtures, and inspect windows and basements for moisture.
- Summer: Monitor poorly ventilated spaces for humidity, clean behind movable furniture when conditions are dry, and inspect kitchens, bathrooms, and laundry areas for leaks.
- Fall: Dust radiators and registers before the heating season, refresh entry floors, check filters per system guidance, and examine weatherstripping.
- Winter: Use mats to catch salt and grit, dry wet floors promptly, and dust more often if heating increases airborne particles.

Common Mistakes to Avoid
- Use one cleaner on every surface.
- Applying too much water or spraying directly onto wood and paint.
- Using steam on uncertain flooring or finishes.
- Ignoring musty odors, stains, soft spots, or peeling paint.
- Climbing on unstable furniture instead of using a proper step stool.
- Mixing bleach with vinegar, ammonia, or other products.
When to Call a Professional
Routine cleaning should stop when there is loose or collapsing plaster, active water intrusion, extensive visible mold, damaged historic glass, deep soot contamination, electrical concerns, or a protected feature that may be altered. Local preservation rules may apply to designated properties, so check with the appropriate city, county, or state preservation office before changing character-defining materials.
Simple Weekly and Monthly Checklist
- Weekly: Dust high-touch surfaces, vacuum floors and stairs with the correct attachment, wipe kitchen and bathroom surfaces, and sweep thresholds and entry mats.
- Monthly: Dust trim, doors, vents, and light fixtures; inspect caulk and grout; and check closets, attics, and basements for musty smells.
- Twice yearly: Complete a room-by-room deep clean, clean accessible heating components, wash windows and screens when conditions are suitable, and review the home for repair needs.
Conclusion
A careful cleaning routine supports both daily comfort and the long life of an older home. Remove dry dust first; use mild products sparingly; limit moisture; test unfamiliar methods; and keep a maintenance log for leaks, cracks, and recurring issues. Small, steady cleaning tasks can preserve the details that give an older house its character. When uncertainty arises, it is better to pause and identify the material or condition than to continue with a stronger, cleaner, or more forceful method. That approach helps cleaning remain part of responsible home care rather than an avoidable source of damage.
©2026 The Dedicated House. All rights reserved. No part of this blog post may be used or reproduced without the written consent of the copyright owner.
Click the links below for any posts you have missed:
 Flooring Buyers Love (and the Kind that Makes Them Walk Away)
 The Benefits of Combining Hardscape and Softscape in Your Garden
 How to Create a Lush Lawn for Your Home: Expert Tips and Tricks
 When Should You Hire An MSPB Defense Lawyer?
 What to Know Before Choosing Custom Cabinets in Southwest Florida
 How to Blend Function and Style in an Open-Concept Living Area
I’d love for you to join my email list! You’ll receive a notification straight to your inbox which will include links to my latest home project posts! Simply enter your address below.
Thanks for stopping by! Have a wonderful day/night depending on where you are in the world! Go with God and remember to be kind to one another!
Toodles,

Leave a Reply