Our homes are more than just structures; they are investments that provide shelter and comfort. Over time, however, even the most robust elements can show signs of wear. One crucial component often overlooked until problems arise is exterior window trim. This seemingly simple framing plays a vital role in protecting your home, enhancing its energy efficiency, and boosting its curb appeal.

Damaged or deteriorating exterior window trim can lead to a host of issues, from unsightly aesthetics to serious structural damage caused by water infiltration. It can also compromise your home’s thermal performance, leading to higher energy bills. Ensuring your windows are properly sealed and framed is essential for overall home health and maintaining comfortable living spaces.
In this comprehensive guide, we will explore everything you need to know about exterior window trim replacement. We’ll cover why it’s so important, how to identify signs of damage, the available material options, and what to expect regarding costs and installation. We will also delve into how proper trim, especially when paired with high-quality windows, contributes to a more energy-efficient and secure home. For instance, pairing robust trim with advanced window systems, such as Milgard energy-efficient windows, creates a formidable barrier against the elements and optimizes indoor climate control. Our aim is to equip you with the knowledge to make informed decisions for upgrading your home’s access and energy efficiency.
Exterior window trim, often called window casing or window surround, is more than just a decorative element; it’s a critical component of your home’s protective envelope. Its primary function is to bridge the gap between the window frame and the exterior wall, creating a seamless and weather-tight seal. Without properly installed and maintained trim, your home becomes vulnerable to a cascade of problems that can compromise its structural integrity, energy performance, and indoor comfort.
At its core, exterior window trim acts as a primary weather barrier, deflecting rain, snow, and wind away from the vulnerable juncture where the window meets the wall. When this trim deteriorates, it ceases to perform its protective duty, allowing water to infiltrate the wall cavity. This water intrusion can lead to serious issues such as wood rot in the framing, the growth of mold and mildew, and ultimately, structural damage that can be costly and extensive to remediate. Ignoring damaged trim can result in remediation costs ranging from $3,000 to $15,000 for water infiltration issues.
Beyond water protection, exterior window trim plays a significant role in your home’s energy efficiency. It helps prevent drafts, which are a major source of heat loss in colder months and heat gain during warmer seasons. Gaps in or around damaged trim allow conditioned air to escape and unconditioned air to enter, forcing your HVAC system to work harder and leading to higher utility bills. By sealing these gaps, quality trim helps maintain a stable indoor temperature and reduce energy consumption.
The structural integrity of your home can also be indirectly affected by compromised trim. While trim itself isn’t a load-bearing element, its failure to protect the underlying wall structure from moisture can lead to the weakening of studs and sheathing. This can eventually compromise the stability of the wall around the window opening.
Finally, the aesthetic contribution of exterior window trim is undeniable. It provides a finished boundary for your windows, adding architectural detail and significantly enhancing your home’s curb appeal. Peeling paint, cracking caulk, and visible wood rot are not only signs of functional failure but also detract from your home’s overall appearance, potentially impacting its market value. Replacing deteriorated exterior trim before listing a home typically returns 80-100% of the cost in avoided price negotiations, highlighting its importance for resale value.
Recognizing the signs that your exterior window trim needs attention is crucial for proactive home maintenance. Common indicators include:
By understanding these critical functions and recognizing the warning signs, homeowners can ensure their exterior window trim continues to protect their investment, enhance energy efficiency, and maintain a beautiful façade.

Evaluating Trim Materials: Cost, Durability, and Maintenance
When considering exterior window trim replacement, one of the most significant decisions you’ll face is selecting the right material. Each option presents a unique balance of cost, durability, aesthetic appeal, and maintenance requirements. Understanding these differences is key to making an informed choice that suits your home’s style, your budget, and your willingness to maintain it.
- Cellular PVC (Polyvinyl Chloride): Often simply called PVC trim, this material is a top recommendation for many homeowners due to its exceptional performance.
- Solid Wood: Traditional and aesthetically pleasing, wood trim offers a classic look that complements many architectural styles. Common choices include cedar, redwood, pine, and mahogany.
- Composite (Engineered Wood): These materials are typically made from a blend of wood fibers, plastics, and binding agents.
- Fiber Cement: A highly durable material composed of cement, sand, and cellulose fibers.
- Aluminum Cladding Often used as a protective wrap over existing wood trim or as a standalone trim piece.
- Foamcore (e.g., Mouldex Composites) An advanced option that uses a high-density expanded polystyrene (EPS) core wrapped in an alkali-resistant fiberglass mesh and coated with a polymer-modified cement.
Here’s a comparative overview of these materials:

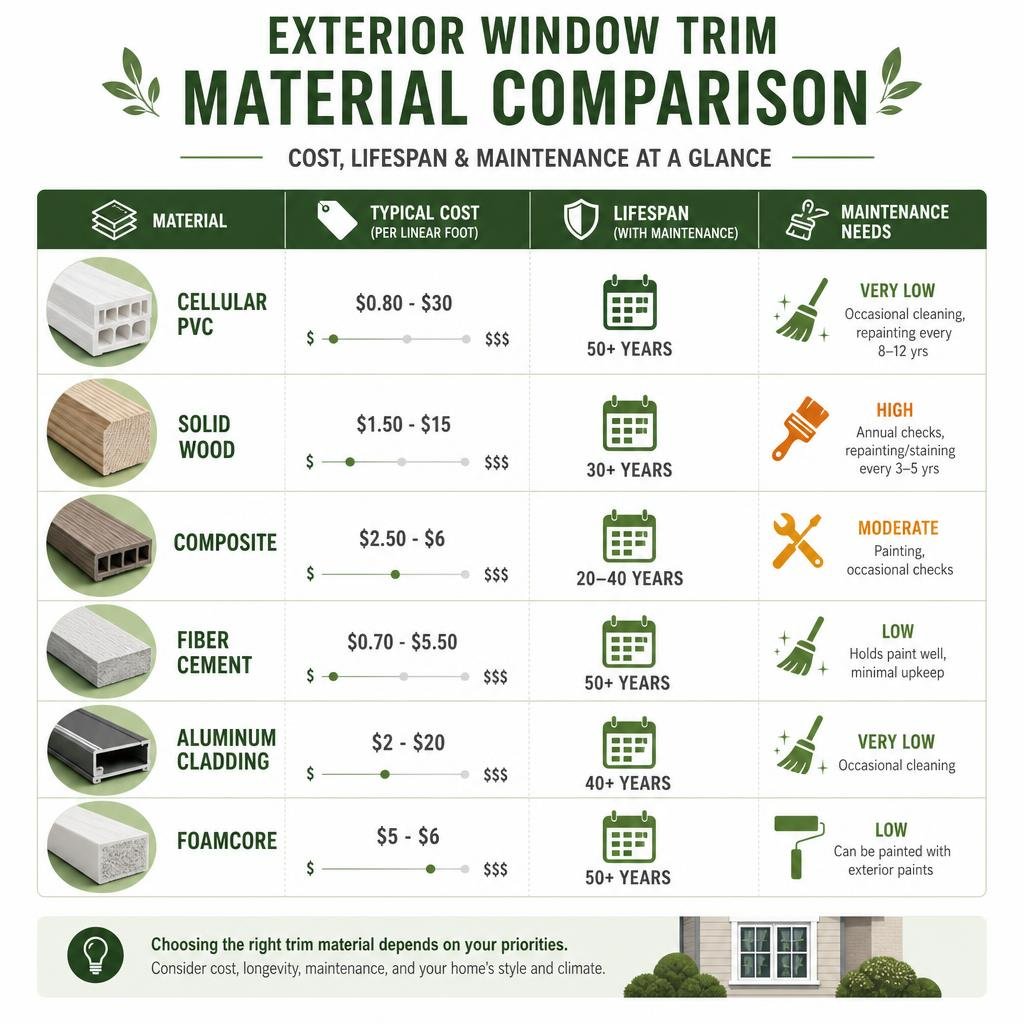
Choosing the right material involves weighing your priorities. If low maintenance and longevity are paramount, cellular PVC or fiber cement are excellent choices. If you prefer the classic look of wood and are committed to regular upkeep, cedar or redwood can be beautiful options. Your home’s architectural style and regional climate considerations (e.g., freeze-thaw cycles, high humidity) should also influence your decision.
Financial Outlook: Costs, Factors, and ROI of Trim Replacement
Understanding the financial aspects of exterior window trim replacement is crucial for budgeting and decision-making. The cost can vary significantly based on numerous factors, but we can provide a general overview of what homeowners can expect.
Nationally, the average cost for exterior window trim replacement is around $2,101, with prices typically ranging from $921 to $3,498. This broad range accounts for differences in materials, labor, and project complexity.
Replacement vs. Repair: For minor cracks or cosmetic defects, repairing existing trim with wood filler and paint (costing around $100-$300 per window) can be a cost-effective solution. However, if the damage is extensive, involves rot, or if the trim is severely outdated, replacement offers a more durable and long-lasting solution. While replacement has a higher upfront cost, it often provides better longevity and prevents recurring issues that can arise from patching severely compromised trim.
Return on Investment (ROI) and Home Value: Replacing deteriorated exterior window trim is a smart investment. It significantly boosts curb appeal, making your home more attractive to potential buyers. More importantly, it addresses critical protective functions, preventing costly water damage and improving energy efficiency. This proactive maintenance can directly translate into a higher appraisal value and a smoother selling process. Statistics show that replacing deteriorated exterior trim before listing a home typically returns 80–100% of the cost in avoided price negotiations, as it eliminates a common red flag for home inspectors and buyers. Upgraded, well-maintained trim signals that the home has been cared for, contributing positively to its perceived value and overall marketability.
Step-by-Step Guide to Replacing Exterior Window Trim
Replacing exterior window trim is a project that can significantly enhance your home’s appearance and weather protection. While complexity can vary, a methodical approach ensures a professional, durable result. This guide outlines the essential steps, emphasizing proper sealing and flashing techniques to prevent water damage.
Step 1: Remove Old Trim. Begin by scoring the caulk lines around the existing trim with a utility knife. This breaks the sealant bond, making removal easier and preventing damage to adjacent siding. Carefully insert a wide putty knife behind the trim, followed by a pry bar. Use protective shims or a scrap piece of wood under the pry bar to prevent damage to the siding. Work slowly and methodically, prying the trim away from the wall. Once the trim is removed, pull out any remaining nails.
Step 2: Inspect and Prepare the Opening. With the old trim gone, thoroughly inspect the exposed wall sheathing and framing around the window. Look for any signs of water damage, rot, mold, or insect activity. If you find any damage, it must be repaired before proceeding. This might involve replacing sections of rotten wood. Clean the area thoroughly, ensuring it’s free of debris, old caulk, and loose paint.
Step 3: Apply Flashing Tape. This is a critical step for preventing water intrusion. Apply self-adhesive flashing tape (also known as window wrap or pan flashing) to the sill of the window opening first. Extend the tape up the sides by at least 6 inches and ensure it adheres smoothly. Next, apply flashing tape up the side jambs, overlapping the sill tape. Finally, apply tape across the header, overlapping the side jamb tapes. The goal is to create a continuous, shingle-lapped barrier that directs any incidental moisture outwards.
Step 4: Install the Sill (if applicable). Many window trim styles include a sill piece at the bottom that extends beyond the side casings. Measure the width of the window opening, adding any desired overhang for the sill. Cut the sill piece to length, ensuring it has a slight slope away from the window (typically 5-10 degrees) to encourage water runoff. Apply a continuous bead of exterior-grade caulk along the back of the sill where it meets the wall and the window frame (this is called back-caulking). Secure the sill with corrosion-resistant nails, driving them into the window frame and wall studs.
Step 5: Install Side Casings. Measure the height from the top of the installed sill to the desired height for the head casing. Cut your side casing pieces to this length. For mitered corners (45-degree angles), cut the top ends of the side casings at 45 degrees, with the long edge facing outwards. Apply back-caulking to the back of each side casing. Position them, leaving a small, consistent reveal (1/8 to 1/4 inch) between the casing edge and the window frame. Secure with corrosion-resistant nails, spacing them every 12-16 inches.
Step 6: Install the Head Casing. Measure the distance between the outside edges of the installed side casings. Cut your head casing to this length, again using 45-degree miter cuts if you’re creating a mitered frame. Apply back-caulking to the back of the head casing. Fit it snugly against the top of the side casings and the wall, ensuring the mitered corners align perfectly. Secure with corrosion-resistant nails.
Step 7: Install Head Flashing (Drip Cap) Above the head casing, install a piece of metal or PVC head flashing, also known as a drip cap. This flashing should extend beyond the edges of the head casing by at least 1 inch on each side and be tucked behind the siding or house wrap above it. The flashing’s purpose is to divert water away from the top of the window and trim, preventing it from running down the trim or seeping behind it. Secure it with short nails, ensuring they don’t protrude from the siding.
Step 8: Caulk and Paint Once all trim pieces are installed, apply a continuous, flexible bead of exterior-grade caulk to all gaps where the trim meets the siding and where the trim pieces meet each other (e.g., mitered corners). Crucially, do not caulk the very bottom edge of the sill where it meets the wall, nor the very bottom edge of the side casings where they meet the sill. Leaving these areas unsealed allows any incidental moisture that gets behind the trim to drain freely, preventing it from becoming trapped and causing rot. After the caulk has cured (check manufacturer’s instructions), prime any bare wood or unprimed trim, then apply two coats of high-quality exterior paint.
Step 9: Inspect and Maintain. After installation and painting, periodically inspect your new trim for any signs of wear, cracking caulk, or paint failure. Address these issues promptly to ensure the long-term protection and aesthetic appeal of your windows.
DIY vs. Professional Installation for Home Access and Efficiency
Deciding whether to tackle exterior window trim replacement yourself or hire a professional is a common dilemma. Both approaches have their merits, and the best choice often depends on your skill level, available tools, the complexity of the job, and your comfort with risk.
DIY Approach: For reasonably handy homeowners, replacing exterior window trim can be a rewarding DIY project, especially for simpler flat-stock trim with butt joints. If you’re comfortable with basic carpentry tools like a miter saw, hammer, nail gun, and caulk gun, you might consider doing the work yourself. Interior casing replacement, for instance, is genuinely DIY-able for most homeowners. A DIYer might take 2-3 hours per window for interior work, saving significant labor costs (e.g., $600-$1,500 for a 10-window interior job).
Balancing Cost and Risk: For exterior work, many experts suggest that while interior casing is genuinely DIY-able, the exterior is best left to professionals to balance cost savings with risk management. The potential for water damage from improper exterior installation is a significant concern that can lead to far greater expenses than the initial cost of hiring a professional. When getting quotes, compare at least three local contractors to ensure fair pricing and check their references and insurance.
Understanding Window Warranties and Home Access and Efficiency
When investing in home improvements, such as exterior window trim replacement, understand how these projects interact with existing window warranties. While the trim itself might come with its own product warranty, the broader implications for your windows’ performance are crucial for long-term home access and efficiency.
Window warranties typically cover the window unit itself, including the frame, glass, and hardware, against defects in materials and workmanship. The specifics can vary greatly between manufacturers and product lines.
To protect your investment and ensure your home’s long-term access and efficiency, always review your existing window warranty documentation before undertaking any significant work around your windows. If in doubt, consult with a certified window professional or the manufacturer directly to understand how exterior trim replacement might impact your coverage. This proactive approach helps avoid costly surprises and ensures that your home remains well-protected and energy-efficient.
Frequently Asked Questions about Window Trim Replacement
Homeowners often have specific questions when considering replacing exterior window trim. Here, we address some of the most common inquiries to help you make informed decisions.
How do you prevent water damage when installing exterior window trim?
Preventing water damage is paramount during exterior window trim installation.
Is it better to repair or replace damaged exterior window trim?
The decision between repair and replacement depends on the extent and nature of the damage:
How do architectural styles influence exterior window trim choices?
Architectural styles heavily dictate the appropriate choice of exterior window trim to maintain aesthetic harmony and historical accuracy.
Matching your trim choice to your home’s architectural style is crucial for curb appeal. Mixing styles rarely works and can make a home look disjointed.
Conclusion
Exterior window trim replacement is a vital home improvement project that extends far beyond mere aesthetics. As we’ve explored, it’s a critical component in safeguarding your home against water damage, enhancing its energy efficiency, and significantly boosting its curb appeal and overall value. From understanding the warning signs of deterioration to selecting the right materials and executing a meticulous installation, every step contributes to the long-term health and performance of your home.
By investing in quality materials and prioritizing proper sealing and flashing techniques, you’re not just replacing old trim; you’re reinforcing your home’s protective envelope. The choice between durable, low-maintenance options like cellular PVC or classic, high-maintenance wood, and the decision to undertake a DIY project or enlist professional expertise, all hinge on a careful assessment of your needs, budget, and comfort with the task.
Well-maintained exterior trim, especially when paired with high-performance windows, ensures that your home remains a comfortable, energy-efficient, and beautiful sanctuary for years to come. Proactive maintenance and informed decisions about your exterior trim will protect your investment and contribute to a healthier, more valuable home.
©2026 The Dedicated House. All rights reserved. No part of this blog post may be used or reproduced without the written consent of the copyright owner.
Click the links below for any posts you have missed:
 4 Aspects You Should Look at When Choosing a Plumbing Service for Yourself
 Exposed Aggregate Pros and Cons for Homeowners
 The Growing Popularity of Wall Cladding for Homes and Businesses in Ireland
 Comprehensive HVAC Installation and Maintenance
 Maintaining Home Comfort with Expert HVAC and Plumbing
 Original Hardwood Floors: The Feature Buyers Notice Before You Point It Out
I’d love for you to join my email list! You’ll receive a notification straight to your inbox which will include links to my latest home project posts! Simply enter your address below.
Thanks for stopping by! Have a wonderful day/night depending on where you are in the world! Go with God and remember to be kind to one another!
Toodles,

Leave a Reply